Saturday, February 18, 2012

President's Day Stories

One of my favorite things about classroom teaching was doing projects centered around read alouds.  I would read to my class and then we would complete an activity based on what they listened to.  There's something sort of magical about having someone read to you so the kids really enjoy it and it increases their listening skills (big plus for everyone involved!).  So, for President's Day I pulled out a couple of stories I had used with my "upper grades" classroom kids (grades 2-5) a few years ago.  You can download each story with a special writing activity included. 


Enjoy!

Thursday, February 16, 2012

Hands on Science - Expanding Soap

A week or two ago Dad sent a link for a project he thought Doodle Bug might like.  Usually these projects are hands on and fun and can be tied into what we are learning about at the time.  Sure enough, it was cool, but on further inspection it's more a chemistry unit than a life science one (although to his credit it did talk about cells).  But, being the lovers of hands on science that we are that didn't stop us (c: 


I made a recording sheet to go with our experiments and you are welcome to use it if you like. (c:  So, the first step is to get your recording sheet and a pencil ready. 


The next step is to gather your supplies.  For the entire process you will need a bar of Ivory soap (yes, you have to use that brand) and a bar of some other soap (we used lever because it's the only bar soap we had on hand); two microwave safe (as in glass, read on to find out why) bowls, a large container for water (or just use your sink if you like) and a butter knife or something similar to help break the soap.


Observe the soaps on the outside.  Compare their physical characteristics (if you have a kitchen scale weigh them, we didn't) - use your senses (except taste, please don't eat the soap).  Now break the soaps open to compare them on the inside.  We had to use a butter knife to start the breaking process.  Don't cut all the way through, though, you need that broken edge to be able to really see the insides.  In our photo above the Ivory soap is on the left and the Lever is on the right.  We noticed small air pockets in the Ivory while the Lever looked like rock layers.


Next, you will want to see what happens when you put the two soaps in water. Make predictions - what do you think will happen when you put the soaps in water?  Fill your container (we used a large tupperware-type bowl, but you can use whatever you like) with water and place the soaps in.  Go ahead and use the broken pieces, it won't effect the outcome at all.


Now for the amazing part of the experiment.  It's time to microwave the soap!  Place a sample of each soap in a microwave safe bowl.  Microwave on high for 1-2 minutes.  You will see that the Ivory soap has a much better reaction to microwaving than the Lever soap.  Caution: That steaming pile of soap is hot - don't touch it or it might burn you. 


When you take the soap from the microwave it will quickly loose it's fluff factor.  You can use this as a discussion point of why this happens - and why the soap fluffs at all.  (Hint: those air pockets trap steam and steam is a magically thing.)


Want to know why you can't use a plastic bowl with the Lever soap?  See that bowl?  When we started this experiment it didn't resemble the surface of Mars quite so much as it does now.  Yeah, microwave safe means glass, my friends.  Also, it's important to note that the Lever bar stunk to high heavens when we microwaved it (yes, I do realize that some of that smell was burning plastic).  We had the window open, the vent fan on and a couple of candles burning to help make the kitchen smell not so much like a chemical facility.  The Ivory soap on the other hand, just smelled strongly like Ivory soap. 


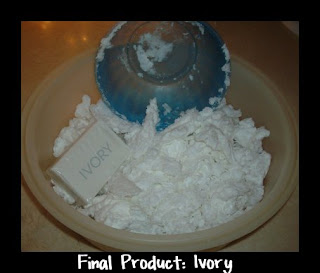
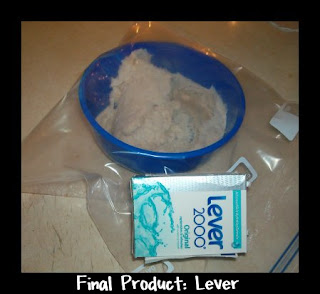
So, in summing things up, you can compare the final product of the two soaps from this experiment.  All of that fluff is from just under one bar of Ivory soap (some of our fluff is permanently embedded into my kitchen rug).  The Lever bar (and it's bowl) are in a freezer bag because, well, they just stunk so bad.  Both soaps are still usable after the experiment is over. In fact, if you have little ones, the Ivory soap flakes would make an awesome sensory tub filler.

Wednesday, February 1, 2012

Monthly Planning - February


It should go without saying that if a person is going to do monthly planning it should get done before the first day of the month.  I know this, but it always seems to sneak up on me anyway. On Monday I was still dating checks for the 20th and still blissfully thinking I had a few more days.  Nope, sorry, wrong again.  Ugh.  So, now, here I am, the morning of February 1st and I'm working out our monthly plan.

This month I got a little, well, creative and wanted to update our regular lesson plan base.  I found the perfect clip art from Olivia (I just love her watercolor look) and started creating away (c:  I'm sharing our February lesson plan base and calendar with you today - just download, print and personalize.

Download February Lesson Plan Pack

I also though I would share a bit about how it is we actually go about planning out our month - I know I wish someone would have shared this with me when I started homeschooling (c:

First, I add any and all family events and then I look up special holidays for the month - we love celebrating!  Next I check out any special events going on at some of our favorite local educational venues and with Girl Scouts and add those to the mix.  At this point our calendar usually looks pretty full - and this month is no different.  The different colors represent different types of events and obligations - some days almost look like rainbow days on our calendar!


After I have our calendar complete I look for any ideas for unit studies to go along with what we might be doing.  This month at the Wildcat Glades they are offering a program called Raptors Rock and Doodle Bug would like to go, if we can wing it (no pun intended).  That same day is also Uncle Bug's basketball game with Special Olympics and if the times don't work out just right we won't be doing both.  If we make it to the raptor event we might do a lap book or something to go along with it.  Another educational option is the Wonders of the Night Sky program going on at the George Washington Carver National Monument.  That might work into our schedule better and even though it's not animal-oriented I think Doodle Bug would still enjoy it.

I count these weekend field trips as part of our homeschooling - after all if public school kids can count a field trip to the movies as "educational" why in the world can't I count something that is actually educational?  Anyhow, because of this our weekly planner has a Saturday spot too.  This doesn't mean that we home school 6 days a week, it just means that I have a spot to jot down our weekend educational adventures.

After I have planned out any unit studies we are doing I fill in the rest with our regular daily work.  I do unit study plans first because they cover a wide range of subjects and that way I know what subjects I actually need an assignment for on that day.  Our regular daily subjects are: Spelling/Vocabulary, Math, Literature, Grammar/Composition, History, Science and Enrichment.  We have a different enrichment class each day of the week - Fine Art, Domestic Art, World Cultures, Fitness and Technology.  Fine art is pretty self explanatory.  Domestic art could really be called Life Skills, but I've found several schools calling their special ed classes this and don't want to be confusing on transcripts.  Basically, Domestic Art includes a mix of traditional home ec, tech ed and extra things like Driver's Ed.  World Cultures rotates from learning Spanish to learning about other cultures.  Our state requirement for this is hazy at best so we are making sure we cover all our bases.  Fitness is just something to get us active and usually involves a trip to the park.  Technology involves using computers or phone apps (that seems to be the wave of the future) for fun learning activities.  Phone apps are a new addition to this subject so we are just testing the waters with it.

I hope today's post has been helpful. Please leave your comments if you download the lesson planner, I would love to know if anyone else is using it. (c:


Tuesday, January 31, 2012

Chinese New Year Dragon Puppet - Low Ink


Not only are we learning about Chinese New Year in our homeschooling adventures, we have done some activities for it in our Girl Scouting adventures as well.  Last week our girls made an awesome Chinese New Year dragon and learned the dragon dance  - it was a HUGE hit.  The only downfall was that everyone did not get to take home their own dragon.  So, this week we made mini Chinese dragon puppets.  I originally found the idea at Crazy Mommy's blog through Pintrest (I could write love poetry for Pintrest!).  I modified the original printable by cleaning up some of the background (it was printing gray so it was using a lot more ink than need be) and making is smaller so that we could make it with ribbon instead of streamers.

The process for making the dragon is pretty simple and they are so neat when finished.


Supplies You Will Need
  • dragon template printed onto cardstock
  • 1 1/2 inch wide ribbon
  • 2 popcicle sticks
  • Fast Grab (or Quick Dry) Tacky Glue
  • scissors
  • markers, crayons, colored pencils, etc
Prep Work
I designed this so that two dragons printed on each page - I hate wasting cardstock and my printer needs each page hand fed when printing on cardstock so this made it go much faster.  Just cut the templates in half before handing them out.  Cut the ribbon into lengths about one foot.  The ribbon we purchased from Hobby Lobby made 12 puppets per spool (which breaks down to 34 cents per dragon for the ribbon).


Directions
Students (or Scouts) color their own dragon heads and tails and cut them out.  Then using Tacky Glue (the Fast Grab is awesome - the girls were playing with their puppets as soon as they were done gluing and they didn't fall apart!) glue the head to one end of the ribbon and the tail to the other.  Flip over your dragon and glue one popcicle stick behind the head and the other behind the tail.  The first dragon I made I didn't glue this way and his poor head was flopping like he had a broken neck - not so great.


You can also forgo the popcicle sticks and have a pretty cool bookmark.  I would laminate the head and tail pieces before gluing it all together to make it extra strong and possibly cut down the length of the ribbon a bit.


Thursday, January 26, 2012

Chinese New Year Matching Game


Okay, first, accept my apologies for not posting a resource yesterday.  We are knee deep into Girl Scout cookie season (ya wanna buy some cookies?) and I had to get all of my troop paperwork in order yesterday.  So, to make up for it I'm sharing two resources today.  (c:  I've already posted the dragon board game printable and this is a simple matching game printable. 

This game has been created using my Chinese New Year clipart that you can purchase over at my website www.lilredschoolhouse.org just in case you would like to create your own Chinese New Year stuffs.

Please comment if you download so I know what you like and what you don't.

Chinese New Year Dragon Game Board


When I found this uber cute Chinese New Year game board I knew we had to use it for something.  At first I was going to make it a multiplication game but that seems a little, well, boring.  I've been working on a few ideas - a Chinese New Year trivia game or maybe something with science, I don't know yet.  But, I wanted to share the blank game board with you before Chinese New Year was over.  So, here it is (c:  I've made a set of cards to match, just in case you might need them.  Sorry, there isn't a low ink version of this one - I didn't draw the dragon and I don't feel right sharing something I didn't work on here.  Thanks for understanding (c:

If you have any ideas on what kind of game to turn this into pretty please leave me a comment and share.  Thanks (c:

Tuesday, January 24, 2012

Chinese New Year Envelope - Low Ink Version


A very sweet friend of mine (hello, Mrs. Valerie!) asked about a black and white version of my Chinese New Year money envelope printable.  Well, when I made the plain paper envelope I just traced my printed color envelope, but that's not very ink effective, now is it?  So, I quickly went to work making a black and white low ink version of this printable to share with you all. 

So, what do you think?  Would you like to see more "low ink" or black and white printables?  Leave a comment and let me know - and if there's something that you would like to see, just let me know.  If I can do it I would be happy to add it for you (c:

Monday, January 23, 2012

Gong Xi Fa Cai -- Happy Chinese New Year


One of my favorite parts of teaching is covering units about other cultures.  During the next couple of weeks we are learning about China to celebrate Chinese New Year.  For today I'm sharing a crafty creation that you can make -  a red money envelope.  I tried printing mine with the red coloring and wasn't a huge fan of my printer's skills (note to self - NEVER buy another Kodak printer).  So, I used my cut out version and made a template for plain red paper (which I would feed through my printer and use the black and white template, but my printer can't seem to understand any paper color other than white.  One more reason for the above note to self).  However, I loved the worn look that the coins had so I was pretty happy with the way those printed.  In any case, I'm sharing with you my designed envelope and you are free to print it as it or use it for a template if you like.  It will print much brighter with a good printer (I know this because I printed similar things with my Lexmark a few years ago and they were gorgeous).

While researching Chinese New Year we found out that two is considered a lucky number and gifts come in twos.  I would be adding an uber cute wrapped orange with this (that I found through Pintrest - my new obsession), but Doodle Bug doesn't care for oranges - even if they are part of the symbolism of the holiday. 

So, instead we'll stick with the paper envelope and the paper coins.  We'll be doing more fun things for Chinese New Year so come back and visit for more ideas.


Thursday, January 19, 2012

Edible Animal Cells


To wrap up our cell unit Doodle Bug made an edible model of an animal cell.  I spent some time looking for ideas online and found most were made using a cookie or cake of some sorts as the base.  While cookies are okay, the end result looks pretty inedible - not something you're going for when the title of your project is edible animal cell, right?  We knew we wanted something round (because it's a well known fact that all good animal cells are round) and something that could have a lot of components but still taste good.  The final verdict was pizza and what a fine choice it was!  On our pizza cell above (sorry, we only have one picture, Doodle Bug's phone ate the rest) we have

  • Crust - cell wall
  • Ranch & mozzarella - cytoplasm
  • Large Canadian bacon round - nucleus
  • Onion round - nucleolus
  • Mitochondria - Canadian bacon bits
  • Vacuoles - green peppers
  • Lysomes - bacon
  • Ribosomes - cheddar cheese
  • Rough ER - mushrooms with ribs
  • Smooth ER - mushrooms without ribs
  • Golgi apparatus - onion
Before putting the pizza all together Doodle Bug went over our cell diagrams in our science notebooks to be sure that all of the parts were accounted for.  Just in case you are wondering, no, this pizza does not have red sauce.  Instead we used ranch dressing - it may sound gross but it tastes great.  When I worked at my dad's pizza joint (many moons ago) this was how I made my pizzas.

If you are going to make your own version of this at home, feel free to mix up the pizza toppings.  You can add in some black olives, other colors of bell pepper and some cooked hamburger.  Just as a word of caution - ranch does not taste so good when mixed with pepperoni or sausage (but creamy Italian dressing would work just fine with them).


Wednesday, January 18, 2012

Artist Study - Andy Goldsworthy


Andy Goldsworthy is generally considered the founder of modern rock balancing. He also often uses brightly-colored flowers, leaves, icicles, mud, pine-cones, snow, stone, twigs, and thorns.


In our group interpretation of Goldsworthy's art we scavenged around in the back yard and gathered up all kinds of "nature".  The final project was a "modernistic" butterfly.


Tuesday, January 17, 2012

Spell 'n' Doodle 26


We're trying a new activity for spelling this week and I have dubbed it Spell 'n' Doodle.  Doodle Bug really enjoys drawing - really, really enjoys drawing.  However, Doodle Bug does not enjoy spelling - really really really does not enjoy spelling.  I've come to notice lately that our days of doing "C" and "D" in her spelling books are pretty much wasted.  She doesn't get a lot of out of those activities (things like finding the spelling words in a running list of letters and learning about words that aren't even part of our spelling lesson) and she doesn't enjoy them.  So being the caring mom (actually the mom who is sick of all of the complaining) that I am, I created a new activity for her to try out.  We're testing it out this week so there's not a lot of feedback to be had, but I am sharing the creation so you can try it out along with us.

The sample above shows you two of the cards I created as examples.  The cards you print for your kiddos have the words, but no doodles (although I did include my doodle cards for you if you have a use for them).  Your students illustrate the words by creating their own doodles.  Then, because this lesson's words are focusing on the Latin roots pend and dict have the students underline the root in each word.  You can also have the students write a sentence using the word on the back or the definition of the word if you would like.  For another activity, have them organize the word cards in alphabetical order and then write the list in their spelling journals (or on plain ol' paper if you don't use a spelling journal).

If you download this creation, please leave a comment.  If you have any ideas for improvement, feel free to leave those too. (c:  To download this file just click on the link below the sample.


Friday, January 13, 2012

Life Science - Organelles Cards


While finishing up our cells unit I wanted to make a game for Doodle Bug to help her remember each cell part and it's function.  We've covered this in the past, but it didn't seem to stick and I was hoping a game would help with that.  So, I took the cell drawing I made, scanned it and turned it into a memory type game.  We've also used these as flash cards to help me see just how much she remembers.  I thought those of you who are also covering cells in your science studies might be able to use these, so I've add them to Google Docs (what an awesome *free* service) and you can download the 27 card set using the link above.  If you want to share this with friends, you can send them here to my blog (which I would greatly appreciate) or you can share the link to the Google Doc - you will need the link though, that's the way my sharing is set up.

Enjoy!

Thursday, January 12, 2012

Life Skills Lessons - Making Japanese Soup


Doodle Bug LOVES to go out for Japanese Hibachi, and it's mainly for the soup (which makes for some pretty expensive soup!).  For our first cooking lesson Doodle Bug wanted to try making a version of this soup at home.  We found a recipe online (thank you, pintrest) and doubled it (which was hubby's idea for adding in some practical math - kudos to hubs).  Here is the recipe we found online:
  • 4 cups chicken broth
  • 2 cups water
  • 1 white onion
  • 1/2 celery stalk, coarsely chopped
  • 1/2 carrot, coarsely chopped
  • salt to taste
  • 1 cup vegetable oil
  • 1 cup flour
  • 4 medium mushrooms, thinly sliced
  • 4 green onion, diced
Combine chicken stock and water in sauce pot over med high heat. Slice the onion in half and coarsely chop one half and reserve the other.
Add the coarsely chopped onion, carrot, celery and salt to sauce pot and bring to a boil. Reduce heat and simmer 20 minutes.
While broth simmers heat veg. oil in small sauce pot over med. heat. Slice remaining onion into thin slices. Separate the slices, dip them into the milk and then into the flour. Fry until lightly browned. Drain on a paper towel.
After soup is done simmering strain veggies out of the broth and toss them. Pour the broth back into pan then leave on low heat to keep warm until ready. Garnish with fried onion, mushroom slices and green onions.We did alter the recipe a bit - like I mentioned before we did double it and once it was done it seemed, well, bland.  Basically, even with a whole onion in it there wasn't a lot of onion flavor - there wasn't a lot of any flavor.  So, to make it more like the Japanese soup we have at the restaurant we add in soy sauce - in our double recipe it was close to an eighth of a cup.  I know that sounds like a lot, but there were 12 total cups of liquid to dilute it.  Doodle Bug (who is a soy sauce fanatic) seems to think there should be a little more, so I would add this to your personal taste.  We only fried about one quarter of an onion - and still had more than enough.  Next time, we will only use a few tablespoons of flour (as we threw out almost all of it).  Also, Doodle Bug does not like mushrooms so those were left off the garnish list.
All in all, the soup was a hit with our alterations, but not so much as it.  This was actually a very valuable lesson - it's good to know how to follow a recipe, but it's also important to not be afraid of adapting things to your own tastes.

Wednesday, January 11, 2012

Literature Notes: Story Elements - Plot


We are gearing up to being our literary analysis project.  Part of that is being able to understand and identify the elements of literature.  Instead of trying to do this along with a movie (which is how we learned it in high school and that has never made sense to me) we are learning each element through short stories and then we will apply all of them to a novel.

We started out our study by reading Rikki-Tikki-Tavi (or The Mongoose and the Snake as Doodble Bug remembers it from childhood) and learning about plot and conflict.
We created a plot line example and learned about the different parts of plot.  Then, after reading the story we created a layered book version of a plot line.
We learned about conflict and the different kinds of conflict that can be found in literature.  Then, we created a flap book that shows what kind of conflict our story has and inside we described the conflict and told whether it was internal or external.

We kept all of our created a cover for our mini books as well illustrating the story that we read to accompany the lesson.

We typically spend a week on each literature selection - covering the prereading notes and reading on day 1, mini books and notes on day 2, workbook pages on days 3 and 4.

Life Science Notes 3 - Cell Structures


The Nucleus
  • found only in eukaryotic cells
  • contains most of the genetic material for the cell

Nuclear Envelope: double membrane that surrounds the nucleus; controls what goes in and out - gate
Chromosomes: strands of DNA wrapped around protiens; found inside nucleus
Nucleolus: produces ribosomes; found inside the nucleus


Differences Between Plant and Animal Cells
  • Plant cells have a large central vacuole that
    • holds water, nutrients and wastes
    • can make up to 90% of the cell's volume
  • Plant cells have a cell wall that give the cell support and protection
  • Plant cells contain plastids
    • chloroplasts used in photosynthesis
    • leucoplasts that store fat and oil
    • chromosplasts that give some flowers and fruits their yellow, orange or red color